Every time a developer manually deploys code to production, there’s a risk. Did they remember to run the tests? Did they build with the right environment variables? Did they deploy the right branch? Manual deployment processes are error-prone, slow, and stressful — especially at 4pm on a Friday when you’re trying to get a hotfix out.
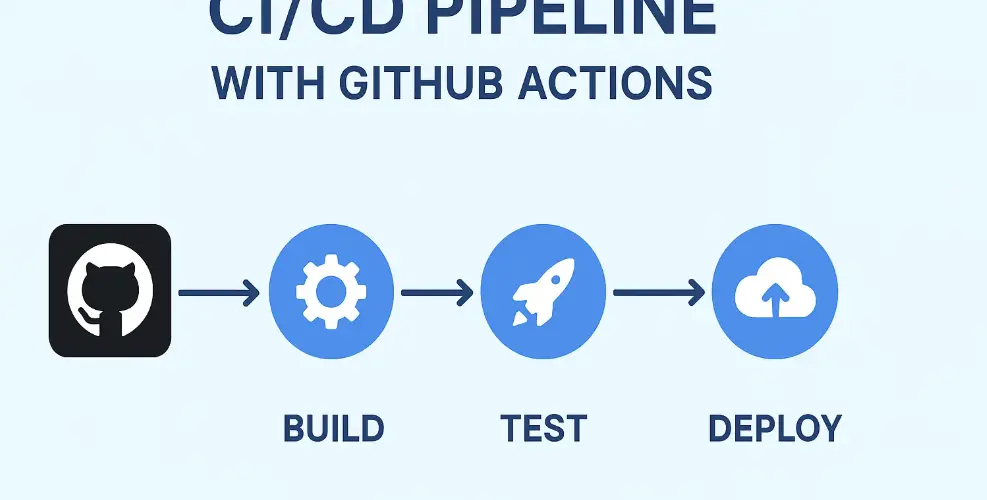
CI/CD pipelines automate all of this. Write code, push it to GitHub, and a few minutes later — automatically, reliably, every single time — your tests have run, your code has been built, and if everything passed, it’s been deployed to production. No manual steps. No forgotten procedures. No human error.
GitHub Actions is currently one of the most popular tools for building these pipelines, and with good reason — it’s built directly into GitHub, free for public repositories, and has an enormous ecosystem of pre-built actions you can drop into your workflow.
What CI/CD Actually Means
Continuous Integration (CI) is the practice of automatically testing every code change as soon as it’s pushed. Every commit triggers a test run. If the tests fail, the team knows immediately — before the broken code has a chance to affect anything else. The goal is to catch bugs as early as possible, when they’re cheap to fix.
Continuous Deployment (CD) takes this further: if all tests pass, the code is automatically deployed to production (or to a staging environment, depending on your setup). The “continuous” part means this happens on every push, not just on scheduled release days.
Together, CI/CD transforms software delivery from an occasional high-stakes event into a routine, low-risk process. Teams that do CI/CD well typically deploy multiple times per day. Teams without it might deploy once a month — and those deployments are often stressful affairs that require careful coordination and a dedicated “deployment day.”
GitHub Actions: The Core Concepts
Before writing any workflow, it helps to understand the vocabulary GitHub Actions uses.
Workflow: An automated process defined in a YAML file stored in the .github/workflows/ directory of your repository. A repo can have multiple workflows.
Trigger (on): What causes the workflow to run. Common triggers include pushing to a branch, opening a pull request, or a scheduled time (like “every night at midnight”).
Job: A collection of steps that runs on the same machine (called a runner). Jobs in the same workflow can run in parallel or sequentially depending on dependencies you define.
Step: A single task within a job — either running a shell command or using a pre-built action from the marketplace.
Action: A reusable piece of code that performs a common task — checking out your repository, setting up a programming language, publishing a Docker image, or sending a Slack notification.
Runner: The machine where your workflow runs. GitHub provides Ubuntu, Windows, and macOS runners for free. You can also use self-hosted runners on your own infrastructure.
Your First Workflow: Automated Testing
Let’s build a real workflow from scratch. This example tests a Python application every time code is pushed:
name: Run Tests

on:
  push:
    branches: [ main, develop ]
  pull_request:
    branches: [ main ]

jobs:
  test:
    runs-on: ubuntu-latest

    steps:
      - name: Checkout code
        uses: actions/checkout@v4

      - name: Set up Python
        uses: actions/setup-python@v5
        with:
          python-version: '3.11'
          cache: 'pip'

      - name: Install dependencies
        run: |
          pip install -r requirements.txt
          pip install pytest pytest-cov

      - name: Run tests with coverage
        run: |
          pytest --cov=src --cov-report=xml

      - name: Upload coverage report
        uses: codecov/codecov-action@v3
        with:
          token: ${{ secrets.CODECOV_TOKEN }}
Save this file as .github/workflows/test.yml and push it to your repository. From now on, every push and every pull request to main will automatically run your tests. Pull requests show a green checkmark if tests pass and a red X if they fail — your team can see at a glance whether code is safe to merge.
Let’s walk through what’s happening. The on block defines when to run: on any push to main or develop, and on any pull request targeting main. The job runs on ubuntu-latest — a fresh Ubuntu virtual machine provisioned by GitHub. Each step either uses a pre-built action (like actions/checkout@v4 to clone your repository) or runs shell commands directly.
Adding a Build Step
For applications that need to be compiled or packaged — like a Docker image or a compiled binary — you add a build step after tests pass. Here’s how to build and push a Docker image to Docker Hub:
  build-and-push:
    needs: test
    runs-on: ubuntu-latest
    if: github.ref == 'refs/heads/main'

    steps:
      - uses: actions/checkout@v4

      - name: Log in to Docker Hub
        uses: docker/login-action@v3
        with:
          username: ${{ secrets.DOCKERHUB_USERNAME }}
          password: ${{ secrets.DOCKERHUB_TOKEN }}

      - name: Build and push Docker image
        uses: docker/build-push-action@v5
        with:
          context: .
          push: true
          tags: |
            myusername/myapp:latest
            myusername/myapp:${{ github.sha }}
The needs: test line means this job only runs if the test job succeeded. The if: github.ref == 'refs/heads/main' condition means it only runs on pushes to the main branch — not on feature branches or pull requests. You don’t want to build and push a production Docker image every time someone pushes a work-in-progress branch.
Notice the ${{ secrets.DOCKERHUB_TOKEN }} syntax. GitHub Actions has a built-in secrets manager — you store sensitive values there (via your repository settings under Security → Secrets) and reference them in workflows. Secrets are never exposed in workflow logs.
Automatic Deployment to a Cloud Server
The final piece is the deployment step. Here’s an example that deploys to a server via SSH after a successful build:
  deploy:
    needs: build-and-push
    runs-on: ubuntu-latest

    steps:
      - name: Deploy to production server
        uses: appleboy/ssh-action@v1
        with:
          host: ${{ secrets.SERVER_HOST }}
          username: ${{ secrets.SERVER_USER }}
          key: ${{ secrets.SSH_PRIVATE_KEY }}
          script: |
            cd /var/www/myapp
            docker pull myusername/myapp:latest
            docker-compose up -d --no-deps --build web
            docker image prune -f
This SSHes into your production server, pulls the latest Docker image, and restarts the application container using Docker Compose. The entire pipeline — test, build, deploy — runs automatically every time you push to main.
Deploying to AWS, Azure, or Google Cloud
All three major cloud providers have official GitHub Actions for their platforms. For AWS Elastic Container Service (ECS), for example, the deployment looks like this:
      - name: Deploy to Amazon ECS
        uses: aws-actions/amazon-ecs-deploy-task-definition@v1
        with:
          task-definition: ecs-task-definition.json
          service: my-service
          cluster: my-cluster
          wait-for-service-stability: true
You authenticate using AWS credentials stored in GitHub Secrets (or better, using OpenID Connect to give GitHub Actions temporary credentials without storing long-lived keys at all).
Environment-Specific Deployments
Most teams deploy to staging before production. GitHub Actions handles this cleanly with environments and protection rules. You can configure your workflow to:
- Automatically deploy to staging when code merges to main
- Require a manual approval from a designated reviewer before deploying to production
- Use different secrets for staging vs production environments
This gives you the automation benefits of CD without removing human oversight for production deployments — a sensible balance for most teams.
Making Your Workflows Fast
Slow CI/CD pipelines are a developer productivity killer. A pipeline that takes 20 minutes to run means waiting 20 minutes to know if your code works. A few strategies to keep things fast:
Cache dependencies. The actions/setup-python, actions/setup-node, and similar actions support caching. Enabling caching means you don’t reinstall all your dependencies from scratch on every run — only when they change. This is often the single biggest speedup you can make.
Run jobs in parallel. If you run unit tests, integration tests, and linting in separate jobs without dependencies between them, they all run simultaneously. A 15-minute sequential test suite might complete in 6 minutes when parallelized.
Only run what needs to run. If a frontend file changes, you probably don’t need to run backend tests. Path filters let you trigger specific jobs only when relevant files change.
The Result: Confidence in Every Deploy
Once your CI/CD pipeline is working well, something shifts in how your team works. Deploying code stops being a stressful event and becomes a mundane part of the workflow. You catch bugs earlier, you ship faster, and you sleep better at night knowing production is running the same code that passed all your tests.
The pipeline I’ve described here — test, build, deploy — is the foundation. Once it’s working, you can extend it: add security scanning, performance tests, automatic database migrations, notifications to Slack, rollback on failed health checks. Each addition is another layer of confidence in your deployment process.